As we learned setting up an absolutely free blog in last article (Please check it here, if you have missed it), we will now learn how to set up an absolutely free SSL certificate to that.
If you have followed my last article on setting up a blog, you might remember, we have downloaded a key which basically serves the purpose of password. Let us explore, how to use that key and log in into our virual machine and manage it completely.
We have two ways for using this key and access our remote server for configuring it with different commands.
- With Codeanywhere (Simple, Web based but paid after free trial)
- With Putty (Desktop app but free)
Table of Contents
How to use Codeanywhere for configuring your remote server ?
- Just go to codeanywhere.com.
- Click on the login button on top right.
- Login using gmail, facebook or other available options.
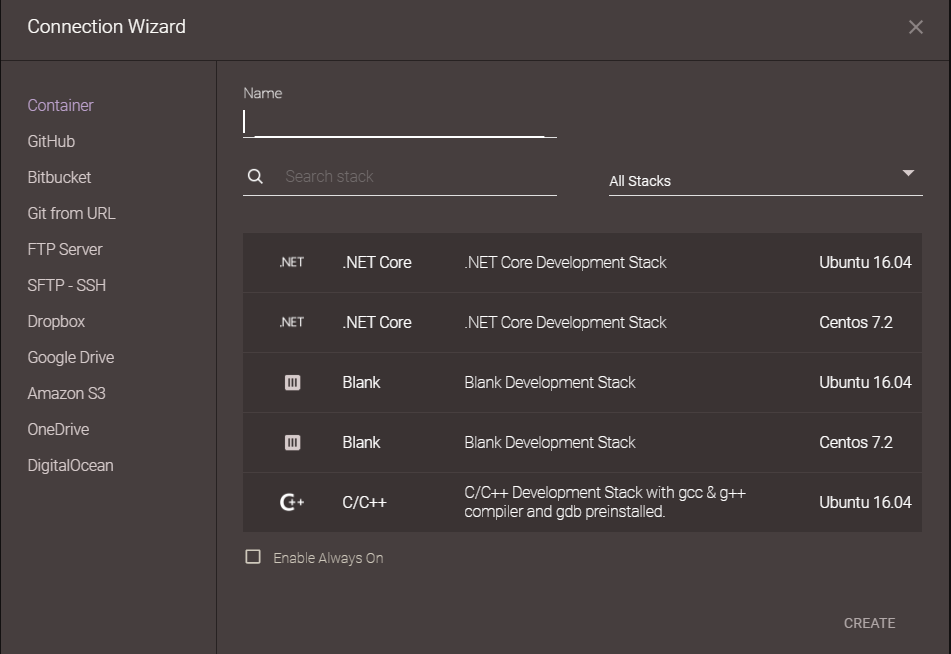
- Once logged in, you will see a screen like below.

- Go to SFTP SSH. And Fill the available options like below.
- Under ‘Connection name’, write any name you like for your connection. It may be your name, your domain name or any name which will represent your connection.
- Under ‘Password’, select ‘Private key’.
- Next, under ‘Hostname’, write your domain address or IP address.
- Under ‘Username’, write ‘bitnami’.
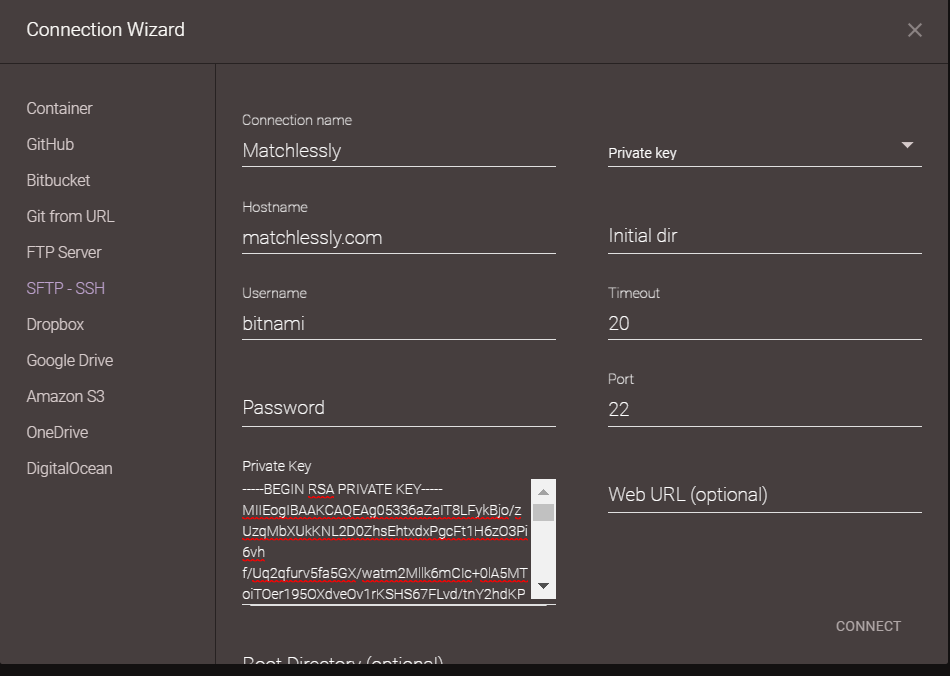
- Under ‘Private key’, just copy and paste the code written inside the key file. (Remember, we downloaded a key file from AWS with extension .pem. Just open that file with notepad and copy-paste it here.)
- Do not remove any single line (Even the comments) from key file while pasting. Once you paste, it will look like below.

- Click on ‘Connect’.
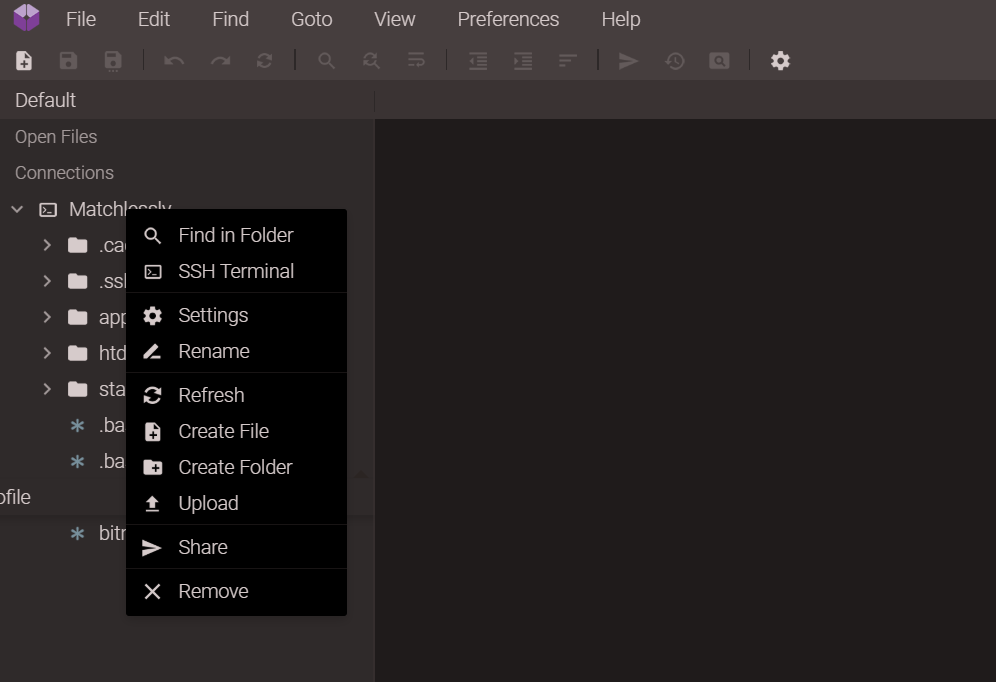
- Once your connection is added, it will look like below.

- The left side bar shows all connections. If you click the connection name (Here ‘Matchlessly’), it will open the file manager for your remote server.
- That means, it will open all the files which are responsible for running your blog. You can manage all the files, change them and add new files.
- Now right click on connection name, it will open a dialog box with different options like below.

- Click on ‘SSH Terminal’. It will open a window like below.

- The terminal which we have opened is for controlling/configuring the remote server. You can install new application, change permissions for specific users/files.
Remember, we are using the free trial of Codeanywhere and it may last for some time period. Although the trial is sufficient for our uses, still if you want to access it further then you can use below procedure. Both ways, we are going to connect to the same terminal. You can skip the below procedure if you did not face any problem and directly go to ‘Set up Let’s Encrypt Certificate to your Bitnami WordPress AMI’.


How to use PUTTY for configuring your remote server ?
So we will use PUTTY application for configuring the remote server. This is an alternative of Codeanywhere. You may use Codeanywhere and skip this part. So before following the below procedure, please click on this link to download PuTTY.
Convert Your Private Key Using PuTTYgen
So as we have downloaded Putty, PuttyGen will automatically follow it.
The key which we have downloaded while creating the blog was of .pem format and because Putty uses .ppk extension, we will have to convert this .pem file to .ppk.
- From the Start menu, choose All Programs, PuTTY, PuTTYgen.
- You will find so many types under Type of key to generate, select RSA or SSH-2 RSA if you have older version of PuTTYgen.

- Select Load. Click on the dropdown next to ‘File name’ and select ‘All files (*.*) and then locate .pem key pair file from your computer.

- PuTTYgen will then show a pop up saying that, ‘.pem file was successfully imported’. Click OK.
- Select Save private key to save the key in .ppk format. You can omit the warning which PuTTYgen displays about saving the key without a passphrase. Choose Yes.
- Give a name to the .ppk file which PuTTYgen has generated and choose Save.
- You now have a private .ppk file to launch your instance using Putty.
Connect to your instance using PuTTY
Once we have generated the .ppk file, we will be able to connect to our AWS AMI. Here is what you need to:
- Open Putty from Start Menu.
- Under Category panel, select Session and complete the following fields:
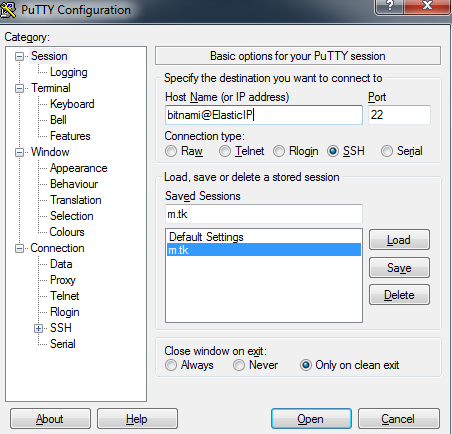
- In the Host Name box, just type bitnami@ElasticIP. ElasticIP is the IP which we have allocated to our AWS instance.
- Port value will be 22.
- Under Connection type, select SSH.
- In the Category pane, expand Connection, expand SSH, and then choose Auth.
- Browse the .ppk file and click on open.
- Choose Yes. A window opens and you are connected to your instance.

Note: When you are connecting first time to your instance using Putty, you may see a dialog box with security alert. This alert will basically ask whether you trust the host you are connecting to. Choose Yes.
Now you are connected to your virtual machine via Putty.
Set up Let’s Encrypt Certificate to your Bitnami WordPress AMI
Whichever way, you have accessed the remote server, you just need to follow the below procedure to set up let’s encrypt certificate.
To launch the Bitnami HTTPS Configuration Tool, execute the following command and follow the prompts:
sudo /opt/bitnami/bncert-toolOr
sudo /opt/bitnami/letsencrypt/scripts/generate-certificate.sh -m YOUREMAIL -d YOURDOMAIN -d www.YOURDOMAINI would suggest putting both domains YOURDOMAIN.com and www.YOURDOMAIN.com to make sure both are secured.
Alternative Approach to Above Command
If the above approach does not work, it may be probably because your Bitnami image does not include the auto-configuration script or /opt/bitnami/letsencrypt/ directory. But don’t worry, you can still install the certificates manually. Just follow the below link which has step by step guide to install the certificate manually.
Click here to check the alternative approach
If there are any challenges, you can please ask them in the comment section.
Aside from being an engineer, I am a software developer, an enthusiastic musician, a regular reader and a hobbyist writer. I love traveling, exploring new places and, of course, playing games (all sorts).
Thank you!
Great Article..Thanks