In the last article, we learned how to set up a let’s encrypt certificate in Bitnami WordPress AMI. Check it out here, if you have missed that.
Once we complete setting up Let’s Encrypt, there occurs another challenge which is to redirect users automatically to secure https URL. So let suppose a user is directly hitting http://domain.extension or http://www.domain.extension then URL shall be redirected to https://domain.extension or https://www.domain.extension automatically.
There are two ways, we can do this.
- With Codeanywhere (Easy, Web based but paid after free trial)
- With WinSCP (Desktop app but free)
Table of Contents
How to use Codeanywhere for accessing file manager of blog ?
If you check my last article, you will learn how to access file manager using Codeanywhere. Once you are ready with Codeanywhere set up, you can skip the below procedure and jump to ‘How to force https redirection in Bitnami ?’
How to use WinSCP for accessing file manager of remote server ?
Download WinSCP. Click on the link given.
- From the Start menu, choose All Programs, WinSCP.
- Once you open WinSCP, click on ‘New Site’ located at the left.
- Then fill in the details of your site like below.
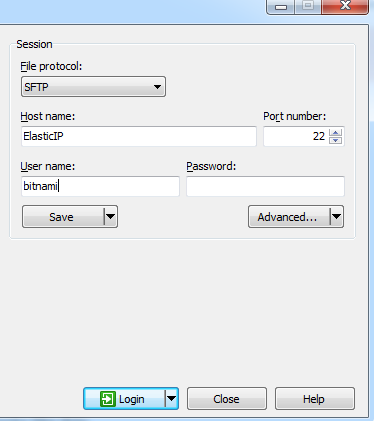
- In Host name, fill the elastic IP of your AWS instance.
- In User name, fill ‘bitnami’.
- Port number shall be 22.
- Leave Password blank.
- Go to Advanced and you will see a screen like below.
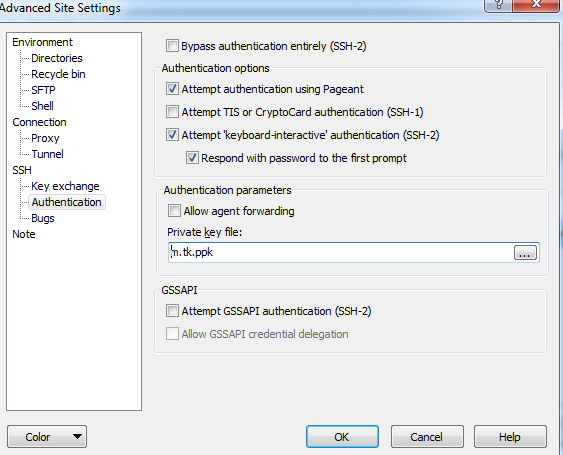
- Click on ‘Authentication’ located at the left panel.
- In the section ‘Authentication parameters’, locate the .ppk file from your computer and then click ‘OK’.
- You will go back to the previous screen, click on ‘Save’ so that all the information you have filled will be saved.
- And then click on ‘Login’.
You will now be inside your virtual machine directories which are responsible for your website’s appearance.
How to force https redirection in Bitnami ?
Whichever way, you have accessed your file manager, you can directly follow the below procedure to force https redirection in bitnami wordpress.
Add the following lines in the default Apache virtual host configuration file at /opt/bitnami/apache2/conf/bitnami/bitnami.conf for WinSCP and /stack/apache2/conf/bitnami/bitnami.conf for Codeanywhere, inside the default VirtualHost directive. In your file, both the directives will be already there, you just need to add the below code in the starting of both the blocks.
<VirtualHost _default_:80>
RewriteEngine On
RewriteCond %{HTTP_HOST} !^(localhost|127.0.0.1)
RewriteRule ^(.*)$ https://www.example.com$1 [R=permanent,L]
...

<VirtualHost _default_:443>
RewriteEngine On
RewriteCond %{HTTP_HOST} !^www.example.com$
RewriteCond %{HTTP_HOST} !^(localhost|127.0.0.1)
RewriteRule ^(.*)$ https://www.example.com$1 [R=permanent,L]
...
Remember to replace your domain name with example.com. There is one more thing which will happen with the above code. Guess what !
Now when you type your IP (The Elastic IP given by AWS), it will automatically resolve to your domain address which will help your search engine SEO. Just the last step now which will change your wordpress home and site URL to https URL.
Specify your domain name in the /opt/bitnami/apps/wordpress/htdocs/wp-config.php file or /stack/apps/wordpress/htdocs/wp-config.php file (If you are doing with Codeanywhere). Edit and replace the following lines as shown, remembering to replace the DOMAIN placeholder with the actual domain name you wish to use:
define('WP_SITEURL', 'http://' . $_SERVER['HTTP_HOST'] . '/');
define('WP_HOME', 'http://' . $_SERVER['HTTP_HOST'] . '/');
with
define('WP_SITEURL', 'https://DOMAIN/');
define('WP_HOME', 'https://DOMAIN/');
So once we complete these steps, our website will be served at https. That means, whenever user hits http://domain.extension or http://www.domain.extension, he/she will be redirected to https://domain.extension or https://domain.extension. But still we have one last thing to fix and that is redirecting https://domain.extension to https://www.domain.extension. You may wonder, why it is required !
This is because of the fact that search engines treat https:// and https://www. as different URLs. And if we keep running two URLs for same website, they will consider this to be a substandard practice and our URL will not be promoted over search engines. So let’s get rid of this now.
How to redirect https:// to https://www.
- Inside winSCP, Just locate the file at /opt/bitnami/apps/wordpress/conf/httpd-prefix.conf or /stack/apps/wordpress/conf/httpd-prefix.conf (If you are using Codeanywhere).
- Check for the below code.
RewriteEngine On
RewriteCond "%{HTTP_HOST}" ^ec2-([0-9]{1,3})-([0-9]{1,3})-([0-9]{1,3})-([0-9]{1,3})...amazonaws.com(:[0-9])?$
RewriteRule "^/?(.*)" "%{REQUEST_SCHEME}://%1.%2.%3.%4%5/$1" [L,R=302,NE]
Replace it to below code.
RewriteEngine On
RewriteCond "%{HTTP_HOST}" ^DOMAIN\.EXTENSION$
RewriteRule "^/?(.*)" "%{REQUEST_SCHEME}://www.DOMAIN.EXTENSION/$1" [L,R=302,NE]
Remember to replace DOMAIN with your actual domain name and EXTENSION with your actual extension (.tk, .com etc).
After all these changes, just restart your apache server with the help of Putty/Codeanywhere terminal.
sudo /opt/bitnami/ctlscript.sh restartAside from being an engineer, I am a software developer, an enthusiastic musician, a regular reader and a hobbyist writer. I love traveling, exploring new places and, of course, playing games (all sorts).